How to use ESP32 Dual-Core in Arduino IDE
ESP32 comes with a dual-core processor. The dual-core processing provides efficiency in terms of performance as well as power consumption. In this post, we’ll explore how to access both cores on the ESP32 and compare the performance between single-core and dual-core operations.
Single Core vs Dual Core
What is Single Core & Dual Core Processing?
In simple terms, dual-core processing means two cores (processing units) that can execute instructions independently. Specifically, the ESP32 has two cores (Core 0 and Core 1), which can run code simultaneously—allowing parallel execution of tasks.
Why is Dual-core processing important?
To understand the importance of dual-core processing, Imagine an example of an ESP32 Wi-Fi drone with a Camera. If the processing is done on a single-core the processor needs to handle movement control(sensors and motor control), Wi-Fi communication, and video streaming. Because of this, there might be issues with drone stability, delays in streaming, or instability in Wi-Fi communication. The ideal solution is to distribute these tasks over multiple cores. Core 0 can perform movement control and video streaming, whereas Core 1 can handle communication.
ESP32 Dual-core
ESP32 has two Xtensa 32-bit LX6 processors, Core 0 and Core 1. By default, the Arduino IDE assigns one of the cores randomly to run the code. Generally, it is not required to choose a core to run your code.
Arduino IDE has a function to identify the core that is running your code:
xPortGetCoreID()Parameters
pin : the Arduino pin numberval : High or Low
nothing
Parameters
pin : the Arduino pin numberval : High or Low
nothing
This function returns the Core ID that is running your code. Let’s see which core the Arduino functions are running on
void setup() {
  Serial.begin(115200);
  Serial.print("Setup running on Core: ");
  Serial.println(xPortGetCoreID());
  delay(1000);
}
void loop() {
  Serial.print("Loop running on Core:");
  Serial.println(xPortGetCoreID());
  delay(1000);
}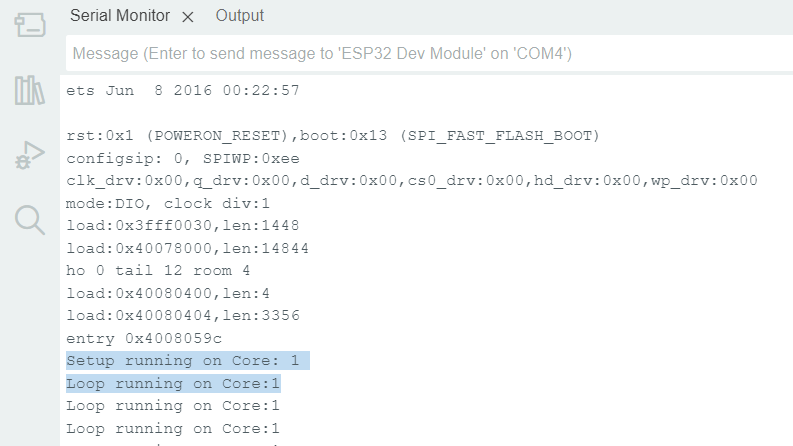
You can see both functions are running on core 1 and only a single core is being utilized.
Creating Tasks
A Task is nothing but a set of code to perform certain actions. Arduino IDE has support for FreeRTOS. FreeRTOS is an open-source real-time operating system kernel for embedded devices.
TaskHandle_t Task;Create a task of type TaskHandlet
xTaskCreatePinnedToCore(
    TaskCode,      // Function
    "TaskName",     // Name
    100,          // Stack size in 32-bit words (100*4 bytes)
    NULL,          // Parameters
    0,             // Priority
    &Task,         // Task handle
0); // Core 0| TaskCode | User-defined function that contains the code |
| “TaskName” | Task name as a string. Helpful for debugging/logging |
| 100 | Stack size in 32-bit words (100*4 bytes) |
| NULL | Pass parameters to the task (optional) |
| 0 | Priority of the Task. 0 – 24, 0 being the lowest priority. |
| &Task | Task handler is useful to suspend, resume, delete, or change Priority later. Pass NULL if not needed |
| 0 | Core ID: Core0 or Core1 |
void TaskCode(void *pvParameters) {
  while (true) {
    // write your code here
  }
}
Write you code inside this. The task function must loop forever, because once it ends, the task will be deleted and memory cleaned up.
Code
TaskHandle_t Task1;
TaskHandle_t Task2;
// Task 1 on Core 0
void TaskOne(void *pvParameters) {
  while (true) {
    Serial.print("Task 1 running on Core: ");
    Serial.println(xPortGetCoreID());
    delay(1000);
  }
}
// Task 2 on Core 1
void TaskTwo(void *pvParameters) {
  while (true) {
    Serial.print("Task 2 running on Core: ");
    Serial.println(xPortGetCoreID());
    delay(2000);
  }
}
void setup() {
  Serial.begin(115200);
  delay(1000);
  // Create Task 1 on Core 0
  xTaskCreatePinnedToCore(
    TaskOne,       // Function
    "TaskOne",     // Name
    1000,          // Stack size
    NULL,          // Parameters
    1,             // Priority
    &Task1,        // Task handle
    0);            // Core 0
  // Create Task 2 on Core 1
  xTaskCreatePinnedToCore(
    TaskTwo,       // Function
    "TaskTwo",     // Name
    1000,          // Stack size
    NULL,          // Parameters
    1,             // Priority
    &Task2,        // Task handle
    1);            // Core 1
}
void loop() {
}
In the example of drone with a Wi-Fi and video streaming which task will have more priority?
How is resource sharing done?
Can you assign the same priority to more than one task? If yes how will both tasks get executed? (Hint: assign the same priority and same delays in the above example)